
索尼相机转换LUT 介绍
索尼相机转换LUT 这是一套对索尼相机用户非常友好的转换lut,可以轻松转换并进行分级调色和曝光补偿,改善肤色,包含假色lut,25个分级调色lut和快速分级LUT,索尼用户必备,非常值得学习与借鉴,收藏备用!


LUTS信息:
适用系统:Windows 和 Mac 系统
支持软件:与Sony Vegas,Premiere Pro CC,After Effects CC,FCPX,DaVinci Resolve等兼容。
文件格式:.CUBE格式
素材大小:约7Mb
传送格式:.zip文件
下载方式:百度网盘/奶牛快传(VIP会员专属高速直通)
索尼相机转换LUT 视频介绍
索尼相机转换LUT 图文介绍
Clean, natural conversion LUTs for select Sony cameras.
适用于特定索尼相机的干净、自然的转换 LUT。
Using these LUTs, you can convert S-Log3 to a pleasing Rec.709 image and make quick adjustments to exposure and skin tones.
使用这些 LUT,您可以将 S-Log3 转换为令人愉悦的 Rec.709 图像,并快速调整曝光和肤色。
This LUT pack includes a false color LUT for use in camera or with a monitor, over 25 grading LUTs and a Color Boost LUT for fast grade finishing.
该 LUT 包包含一个可用于相机或显示器的假彩色 LUT、超过 25 个分级 LUT 和一个用于快速分级完成的 Color Boost LUT。

FALSE COLOR LUT 假色查找表
The false color LUT only displays three colors:
假彩色 LUT 只显示三种颜色:
- Red = Highlight Clip 红色 = 高亮剪辑
- Dark Green = Correct Skin Exposure 深绿色=正确的皮肤暴露
- Light Green = 1 Stop Over Skin Exposure 浅绿色 = 1 停止皮肤暴露
This means at a glance you can check for highlight clipping and ensure correct skin exposure.
这意味着您可以一眼检查高光剪辑并确保正确的皮肤曝光。
The colors displayed in this LUT have been specifically tuned to the S-Log3 and can even be used in Sony cameras that support .cube LUTs.
此 LUT 中显示的颜色已专门针对 S-Log3 进行调整,甚至可以在支持 .cube LUT 的索尼相机中使用。

False Color LUT Applied to S-Log3 Footage
应用于 S-Log3 素材的假色彩 LUT
GRADING LUTS LUTS 调色
The grading LUTs can be used to achieve very pleasing color and will correct several issues with the stock Sony technical conversion LUTs.
分级 LUT 可用于实现非常令人愉悦的色彩,并将纠正索尼库存技术转换 LUT 的几个问题。
These LUTs are NOT creative LUTs. Color and contrast are natural and clean. These LUTs are designed to quickly get your image 90% complete while also improving color.
这些 LUT 并非创意 LUT。色彩和对比度自然干净。这些 LUT 旨在快速提升图像 90% 的完成度,同时改善色彩。
Sony’s stock S-Log3 LUT have a few issues I’ve always found myself fixing:
索尼的 S-Log3 LUT 库存中存在一些我始终需要修复的问题:
- Yellow and warm tones are too close to green.
黄色和暖色调与绿色太接近。 - Blues lean toward magenta
蓝色偏向洋红色 - Skin looks sickly (especially on the A7s III/FX3)
皮肤看起来病态(尤其是在 A7s III/FX3 上)
Rather than spend time correcting every shot, I created these LUTs to speed up my post workflow and have added three additional features which are detailed below.
我没有花时间校正每个镜头,而是创建了这些 LUT 来加快我的后期工作流程,并添加了下面详述的三个附加功能。
All the LUTs in this pack have the same base corrections. These include rotating each color slightly to correct unpleasing colors. Mainly yellows and reds.
此包中的所有 LUT 都具有相同的基本校正。这些校正包括略微旋转每种颜色以校正不美观的颜色。主要针对黄色和红色。
The biggest difference can be seen in skin tones and other natural elements in your shots like grass, trees and warm tones.
最大的区别可以在照片中的肤色和其他自然元素上看到,例如草、树和暖色调。

Sony Rec.709 LUT (Left) vs Pike Rec.709 LUT (Right)
Sony Rec.709 LUT(左)与 Pike Rec.709 LUT(右)

Sony Rec.709 LUT and Pike Rec.709 LUT overlay with color notes
Sony Rec.709 LUT 和 Pike Rec.709 LUT 叠加,带有颜色注释

Sony Rec.709 LUT (Left) vs Pike Rec.709 LUT (Right)
Sony Rec.709 LUT(左)与 Pike Rec.709 LUT(右)
EXPOSURE SHIFT 曝光偏移
Each grading LUT has two numbers signifying exposure shift. This allows you to overexposure your footage (to improve noise performance) and grade those shots easily. There are 5 exposure LUT levels to choose from:
每个调色 LUT 都有两个数字表示曝光偏移。这允许您过度曝光素材(以改善噪点表现),并轻松对这些镜头进行调色。共有 5 个曝光 LUT 级别可供选择:
- 0-0 – No exposure shift 无曝光偏移
- 0-5 – For shots overexposed by 0.5 stop (or half a stop) 适用于曝光过度 0.5 档(或半档)的照片
- 1-0 – For shots overexposed by 1 stop 曝光过度 1 档的照片
- 1-5 – For shots overexposed by 1.5 stops 拍摄过度曝光 1.5 档的照片
- 2-0 – For shots overexposed by 2 stops 拍摄过度曝光 2 档的照片
These exposure shifts allow you to easily compensate for overexposures without having to spend as much time correcting shots manually. Simply find the LUT that works best with the exposure of your clip and the LUT will apply the shift and convert to Rec.709 in one click.
这些曝光偏移功能让您可以轻松补偿过度曝光,无需花费大量时间手动校正镜头。只需找到最适合您素材曝光度的 LUT,LUT 就会应用偏移,并一键转换为 Rec.709 格式。

Shot overexposed by 1.5 stops (Left) Pike 1.5 Stop Shift LUT (Right)
拍摄过度曝光 1.5 档(左)Pike 1.5 档移位 LUT(右)
SKIN TONE SHIFTS 肤色变化
Each LUT has a skin shift option available in five strengths:
每个 LUT 都有一个皮肤变化选项,有五种强度可供选择:
- Base – No skin color shift
底色 – 无肤色变化 - Skin1 – Very minimal skin shift
Skin1 – 极小的皮肤变化 - Skin2 – Minimal skin shift
Skin2 – 最小皮肤变化 - Skin3 – Medium skin shift
Skin3 – 中等皮肤变化 - Skin4 – Strong skin shift
Skin4 – 强烈的皮肤变化
These skin color shifts take the red in skin tones and shifts it toward orange. This can been seen on a vectorscope as reds rotating toward the skin tone line on a vector scope.
这些肤色变化使肤色中的红色向橙色偏移。在矢量示波器上可以看到,红色旋转着靠近肤色线。

Skin tone shift LUTs from base (no shift) to Skin4 (strong)
肤色转换 LUT 从基础(无转换)到 Skin4(强)
COLOR BOOST LUT 色彩增强查找表
New in V3 of the LUT pack is the the Color Boost LUT. This LUT is designed to be used after the main grading LUTs to add boost color without affecting neutral colors like grey, black and white. This method of introducing more color is much more pleasing than simply raising a saturation bar.
V3 LUT 包新增了色彩增强 LUT。该 LUT 旨在在主调色 LUT 之后使用,以增强色彩,同时不影响灰色、黑色和白色等中性色。这种引入更多色彩的方法比单纯提高饱和度条更令人愉悦。
Simply apply this LUT after the main grading LUTs, set opacity to zero and raise the opacity until color is full and pleasing.
只需在主分级 LUT 之后应用此 LUT,将不透明度设置为零,然后提高不透明度,直到颜色饱满且令人愉悦。

如何在Final Cut Pro X中加载LUTs?
打开fcpx软件,找到【效果】面板-【颜色】-【自定LUT】添加到影片上
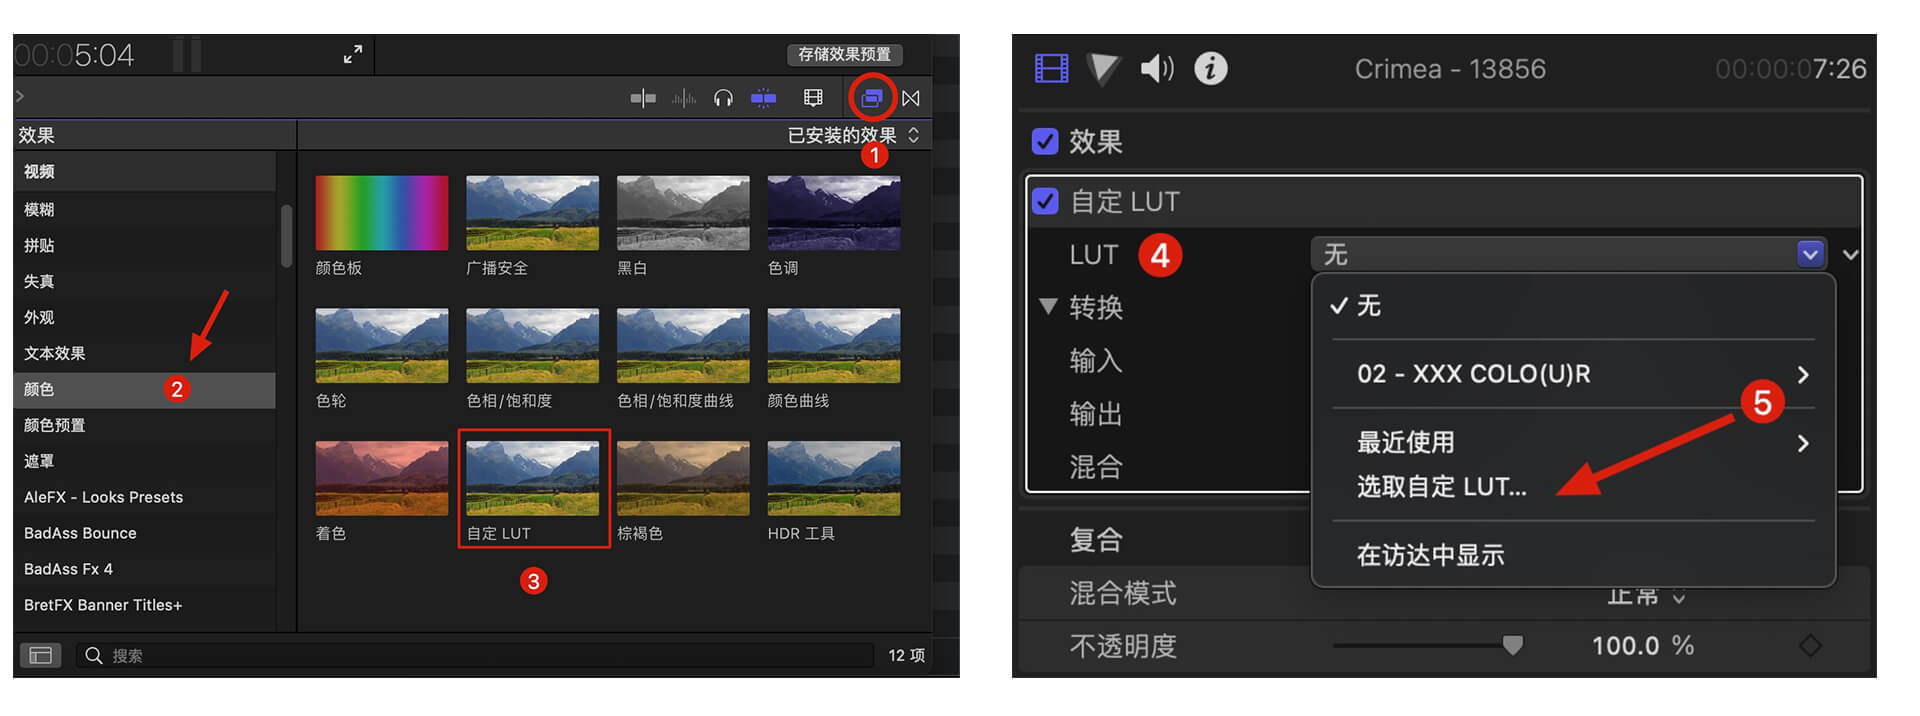
在【LUT】参数项-【选取自定义LUT…】选取要加载的LUTS文件夹或者.cube文件。
PS:如果选择LUTS文件夹,即可将整个文件夹加载,并在【LUT】参数项保留,方便分类管理,但是注意尽量不要使用中文及特殊字符。
如何在Premiere Pro中加载LUTs?
首先打开下方路径:
Mac 系统: /Library/Application Support/Adobe/Common/LUTs
Windows 系统: \Program Files\Adobe\Common\LUTs
拷贝 例如“Log to Rec709” LUTs到上述文件夹内.
PS:为方便归类,自己可以在上方路径下创建新的文件夹。
如何在DaVinci Resolve中加载LUTs?
首先打开下方路径:
Mac 系统: Macintosh HD/Library/Application Support/Blackmagic Design/DaVinci Resolve/LUT
Windows 系统: C:\ProgramData\Blackmagic Design\DaVinci Resolve\Support\LUT
拷贝 例如“Log to Rec709” LUTs到上述文件夹内即可.
相关使用参考及管理工具:
Red Giant Magic Bullet Suite 2023.2.1 红巨人降噪磨皮调色插件套装 Mac版本
MotionVfx Mlut 3.0 LUTS管理工具 预览加载调节
fcpx调色视频教程 如何使用fcpx自带LUT加载工具加载LUTS 附16组电影调色

