达芬奇电影胶片模拟全功能包 介绍
达芬奇电影胶片模拟全功能包 这是一套由 mononodes 出品的专业达芬奇电影胶片模拟全功能包,包含LUTS及镜头、纹理、调色、叠加层的达芬奇节点,不止于颜色匹配的电影胶片美学,完美的呈现真实电影胶片之美,十分推荐,收藏备用!
Included:包含内容
3 Film Stock LUTs (.cube)
33 PowerGrades (for DaVinci Resolve)
40 Dirty Mattes (4k, png)
4 Sprocket Holes Loop Files (4 videos)
Dirt Elements Loop File (1 video)
PDF User Guide (50 pages)
Powergrade节点信息:
系统要求:Win+Mac
软件兼容:DaVinci Resolve Studio.18+
文件大小:644Mb
官方链接:点我进入
下载方式:百度网盘/奶牛快传(VIP会员专属高速直通)
教程参考:官方英文使用参考
达芬奇电影胶片模拟全功能包 视频介绍
达芬奇电影胶片模拟全功能包 图文介绍
TO FILM AESTHETICS 电影美学
This project is about reproducing characteristics that I personally associate with film aesthetics. I have therefore dealt intensively with the emulation of film stock and decided to built two film stocks of my own.
这个项目旨在重现我个人认为与电影美学相关的特征。因此,我深入研究了胶片的模拟,并决定制作两部自己的胶片。
In addition, the film aesthetic does not end with matching colors. I’m interested in lens flaws like chromatic aberration, lens distortion, petzval field curvature, and so on. Furthermore, I’m also interested in recreating special “sharpness aesthetics” and other texture elements like Halation, Flicker, Gate Weave and Film Damage.
此外,电影美学并不止于颜色匹配。我对镜头缺陷很感兴趣,比如色差、镜头畸变、匹兹伐场曲率等。此外,我还对重现特殊的“锐度美学”和其他纹理元素感兴趣,比如光晕、闪烁、门纹和胶片损坏。
I will also show you some techniques on how to achieve a higher “color density”. For film print emulation, I’ve created some PowerGrades that will teach you how to be more flexible with Print Film Emulation LUTs from DaVInci Resolve and customize them to your own preferences. Additionally, I designed some dirty mattes and created digital sprocket holes for an overscan look to top it all off.
我还将向您展示一些如何实现更高“色彩密度”的技巧。对于胶片印刷模拟,我创建了一些 PowerGrades,它们将教您如何更灵活地使用 DaVInci Resolve 中的印刷胶片模拟 LUT 并根据您自己的喜好进行自定义。此外,我还设计了一些脏遮罩并创建了数字孔以获得过扫描效果,从而让这一切锦上添花。


KD 5213
KD 5213′ LUT: Crafted with inspiration from ‘KODAK VISION3 200T Color Negative Film 5213’. No official association with Kodak.
KD 5213′ LUT:灵感源自“KODAK VISION3 200T 彩色负片 5213”。与柯达无官方关系。
The LUT expects “Arri Alexa / Arri LogC” (Color Space / Gamma) as input signal and are designed to work with DaVinci Resolve’s Rec709 Print Film Emulation LUTs.
LUT 需要“Arri Alexa / Arri LogC”(色彩空间 / 伽马)作为输入信号,并且设计用于与 DaVinci Resolve 的 Rec709 印刷胶片模拟 LUT 配合使用。
KD 2254 KEM
The “KD 2254 KEM” LUT is inspired and designed by the look of the “FotoKem’s SHIFTai” project. No official association with FotoKem. The LUT expects “Arri Alexa / Arri LogC” (Color Space / Gamma) as input signal and are designed to work with DaVinci Resolve’s Rec709 Print Film Emulation LUTs.
“KD 2254 KEM” LUT 的设计灵感和设计均来自“FotoKem’s SHIFTai”项目的外观。与 FotoKem 没有官方关联。该 LUT 需要“Arri Alexa / Arri LogC”(色彩空间 / 伽马)作为输入信号,并设计用于与 DaVinci Resolve 的 Rec709 印刷胶片模拟 LUT 配合使用。
MONOMOD 2383 A
The “MONOMOD 2383 A” LUT is designed after “KODAK VISION Color Print Film 2383” with included neg. Film and a Film Matrix. The Final Print is a modified version of the Kodak 2383 LUT by DaVinci Resolve.
“MONOMOD 2383 A” LUT 是根据“KODAK VISION 彩色印刷胶片 2383”设计的,包括负片和胶片矩阵。最终印刷品是 DaVinci Resolve 对 Kodak 2383 LUT 的修改版本。


CHROMATIC ABERRATION 色差
Chromatic aberration is a failure of a lens, as a result of which light rays focus at different points depending on the wavelength. Lateral Chromatic Aberration is only seen at the edges of an image. Some lenses create complex color fringing that often combines two complimentary color types: red & cyan and/or blue & yellow. In the package you will find two chromatic aberration presets. In this package you will find two chromatic aberration presets.
色差是镜头的一种缺陷,导致光线根据波长聚焦在不同点。横向色差仅出现在图像的边缘。一些镜头会产生复杂的色边,通常结合两种互补的颜色类型:红色和青色和/或蓝色和黄色。在软件包中,您将找到两个色差预设。在此软件包中,您将找到两个色差预设。

LENS BLUR / PETZVAL FIELD CURVATURE
镜头模糊/PETZVAL 场曲率
“Petzval’s curvature of field” is an optical problem that causes a flat object to appear in focus only in a certain part of the image, instead of being consistently sharp over the entire image area. It does this because of the curved nature of optical elements, which project the image curved rather than flat. In DaVinci Resolve, if you try the Lens Blur Open FX plugin or just draw an oval mask and blur it, the results are not satisfactory. As you can see at the images on the left. So I built my own PowerGrades for a lens blur effect that is more realistic.
“Petzval 场曲”是一种光学问题,它会导致平面物体仅在图像的某个部分清晰可见,而不是在整个图像区域始终清晰可见。这是因为光学元件具有弯曲特性,它们投射的图像是弯曲的而不是平面的。在 DaVinci Resolve 中,如果您尝试使用 Lens Blur Open FX 插件或只是绘制一个椭圆形蒙版并对其进行模糊处理,结果并不令人满意。如您在左侧图像中看到的那样。因此,我构建了自己的 PowerGrades,以获得更逼真的镜头模糊效果。

LENS DISTORTION 镜头失真
Distortion takes place when the straight lines of an image appear curved or misshapen in an unusual way for the eye. Lens distortion is primarily characterized by very regular and symmetrical patterns. The three most common types are known as “barrel distortion”, “pincushion distortion” and “mustache distortion”. For this package, I designed three types of barrel distortion, depending on the focal length of a lens.
当图像中的直线以不寻常的方式呈现弯曲或畸形时,就会发生失真。镜头失真的主要特征是图案非常规则且对称。最常见的三种类型是“桶形失真”、“枕形失真”和“胡须失真”。对于此包,我根据镜头的焦距设计了三种桶形失真。

GATE WEAVE & FLICKER 门控摆动和闪烁
Film is always moving. When a film frame passes through a camera, scanner or projector, sprockets control the motion of the frames. A film can become warped or gear can wear out, causing the frame to appear to move side to side.
胶片总是在移动。当胶片画面经过照相机、扫描仪或投影仪时,链轮会控制画面的运动。胶片可能会变形或齿轮可能会磨损,导致画面看起来左右移动。
For this pack I’ve added a few more nodes to the PowerGrade that emulate “micro jitter” combined with a node for the standard gate weave effect, inspired by movies from the 80’s and 90’s. I’ve also added a new “RGB Flicker” node that affects each RGB value separately, which is more accurate.
对于此包,我向 PowerGrade 添加了一些节点,用于模拟“微抖动”,并结合了标准门编织效果的节点,灵感来自 80 年代和 90 年代的电影。我还添加了一个新的“RGB 闪烁”节点,该节点分别影响每个 RGB 值,这更准确。

SOFTEN & SHARPEN 柔化与锐化
In this pack you will find some sharpening techniques that mimic the sometimes very hard film sharpening. Which of course can be modified and reduced at will. I also combined it with advanced softening techniques.
在此包中,您将找到一些模仿有时非常困难的胶片锐化的锐化技术。当然,可以随意修改和减少。我还将其与高级软化技术相结合。

COLOR DENSITY 色彩密度
In the package you will find two PowerGrades that allow you to create “deep, rich saturated colors” that blend well with the surrounding less saturated colors. The first PowerGrade gives you overall “denser” colors for RED, BLUE & GREEN. The second PowerGrade allows you to increase or decrease the luminance values of each color individually.
在该软件包中,您将发现两个 PowerGrades,它们允许您创建“深沉、丰富饱和的颜色”,并与周围不太饱和的颜色很好地融合。第一个 PowerGrade 为您提供整体“更浓密”的红色、蓝色和绿色颜色。第二个 PowerGrade 允许您单独增加或减少每种颜色的亮度值。
With these PowerGrades you can create film-aesthetic colors that are usually only possible with Print Film Emulation LUTs. Of course, you can mix the color density nodes with a print film emulation as you like.
使用这些 PowerGrades,您可以创建通常只有使用 Print Film Emulation LUT 才能实现的具有电影美感的色彩。当然,您可以根据需要将颜色密度节点与 Print Film Emulation 混合使用。


VIDEO COLLAGE 视频拼贴
This compound node splits your footage into three frames. The preset is designed for a 1:85 Dirty matte, but can be quickly adjusted to other mattes. I separated “dirty matte” and “sprocket hole” for more flexibility. This allows you to add film grain, halos, light leaks, and film damage elements without affecting the sprocket holes.
此复合节点将您的素材分成三帧。该预设是为 1:85 脏遮罩设计的,但可以快速调整为其他遮罩。我将“脏遮罩”和“孔洞”分开,以获得更大的灵活性。这样您就可以添加胶片颗粒、光晕、漏光和胶片损坏元素,而不会影响孔洞。
DIRTY MATTE 哑光
I created several dirty mattes for different aspect ratios. 40 total. 3840×2160 pixels. PNG
我为不同的长宽比创建了几个脏遮罩。总共 40 个。3840×2160 像素
20 single-frame dirty mattes
20 张单帧脏蒙版
for these aspect ratios: 对于这些纵横比:
1.33:1 / 1.66:1 / 1.85:1 / 2.00:1 / 2.35:1
20 three-frame dirty mattes
20 张三帧脏蒙版
for these aspect ratios: 对于这些纵横比:
1.33:1 / 1.66:1 / 1.85:1
SPROCKET HOLES 链轮孔
I designed 4 sprocket holes for this package.
我为这个包装设计了 4 个链轮孔。
Codec: QuickTime mov, DNxHR with alpha channel
编解码器: QuickTime mov,带 alpha 通道的 DNxHR
Resolution: 540 x 540 pixel (square format)
分辨率: 540 x 540像素(方形格式)
Frame rate: 24 fps
帧速率: 24 fps
Length: 10 second loop
长度: 10秒循环
The holes are centered, so you can move, stretch, twist and turn these sprocket holes until you are happy with the result. You can change color and intensity with curves and log wheels.
这些孔位于中心,因此您可以移动、拉伸、扭曲和转动这些孔,直到您对结果满意为止。您可以使用曲线和对数轮更改颜色和强度。
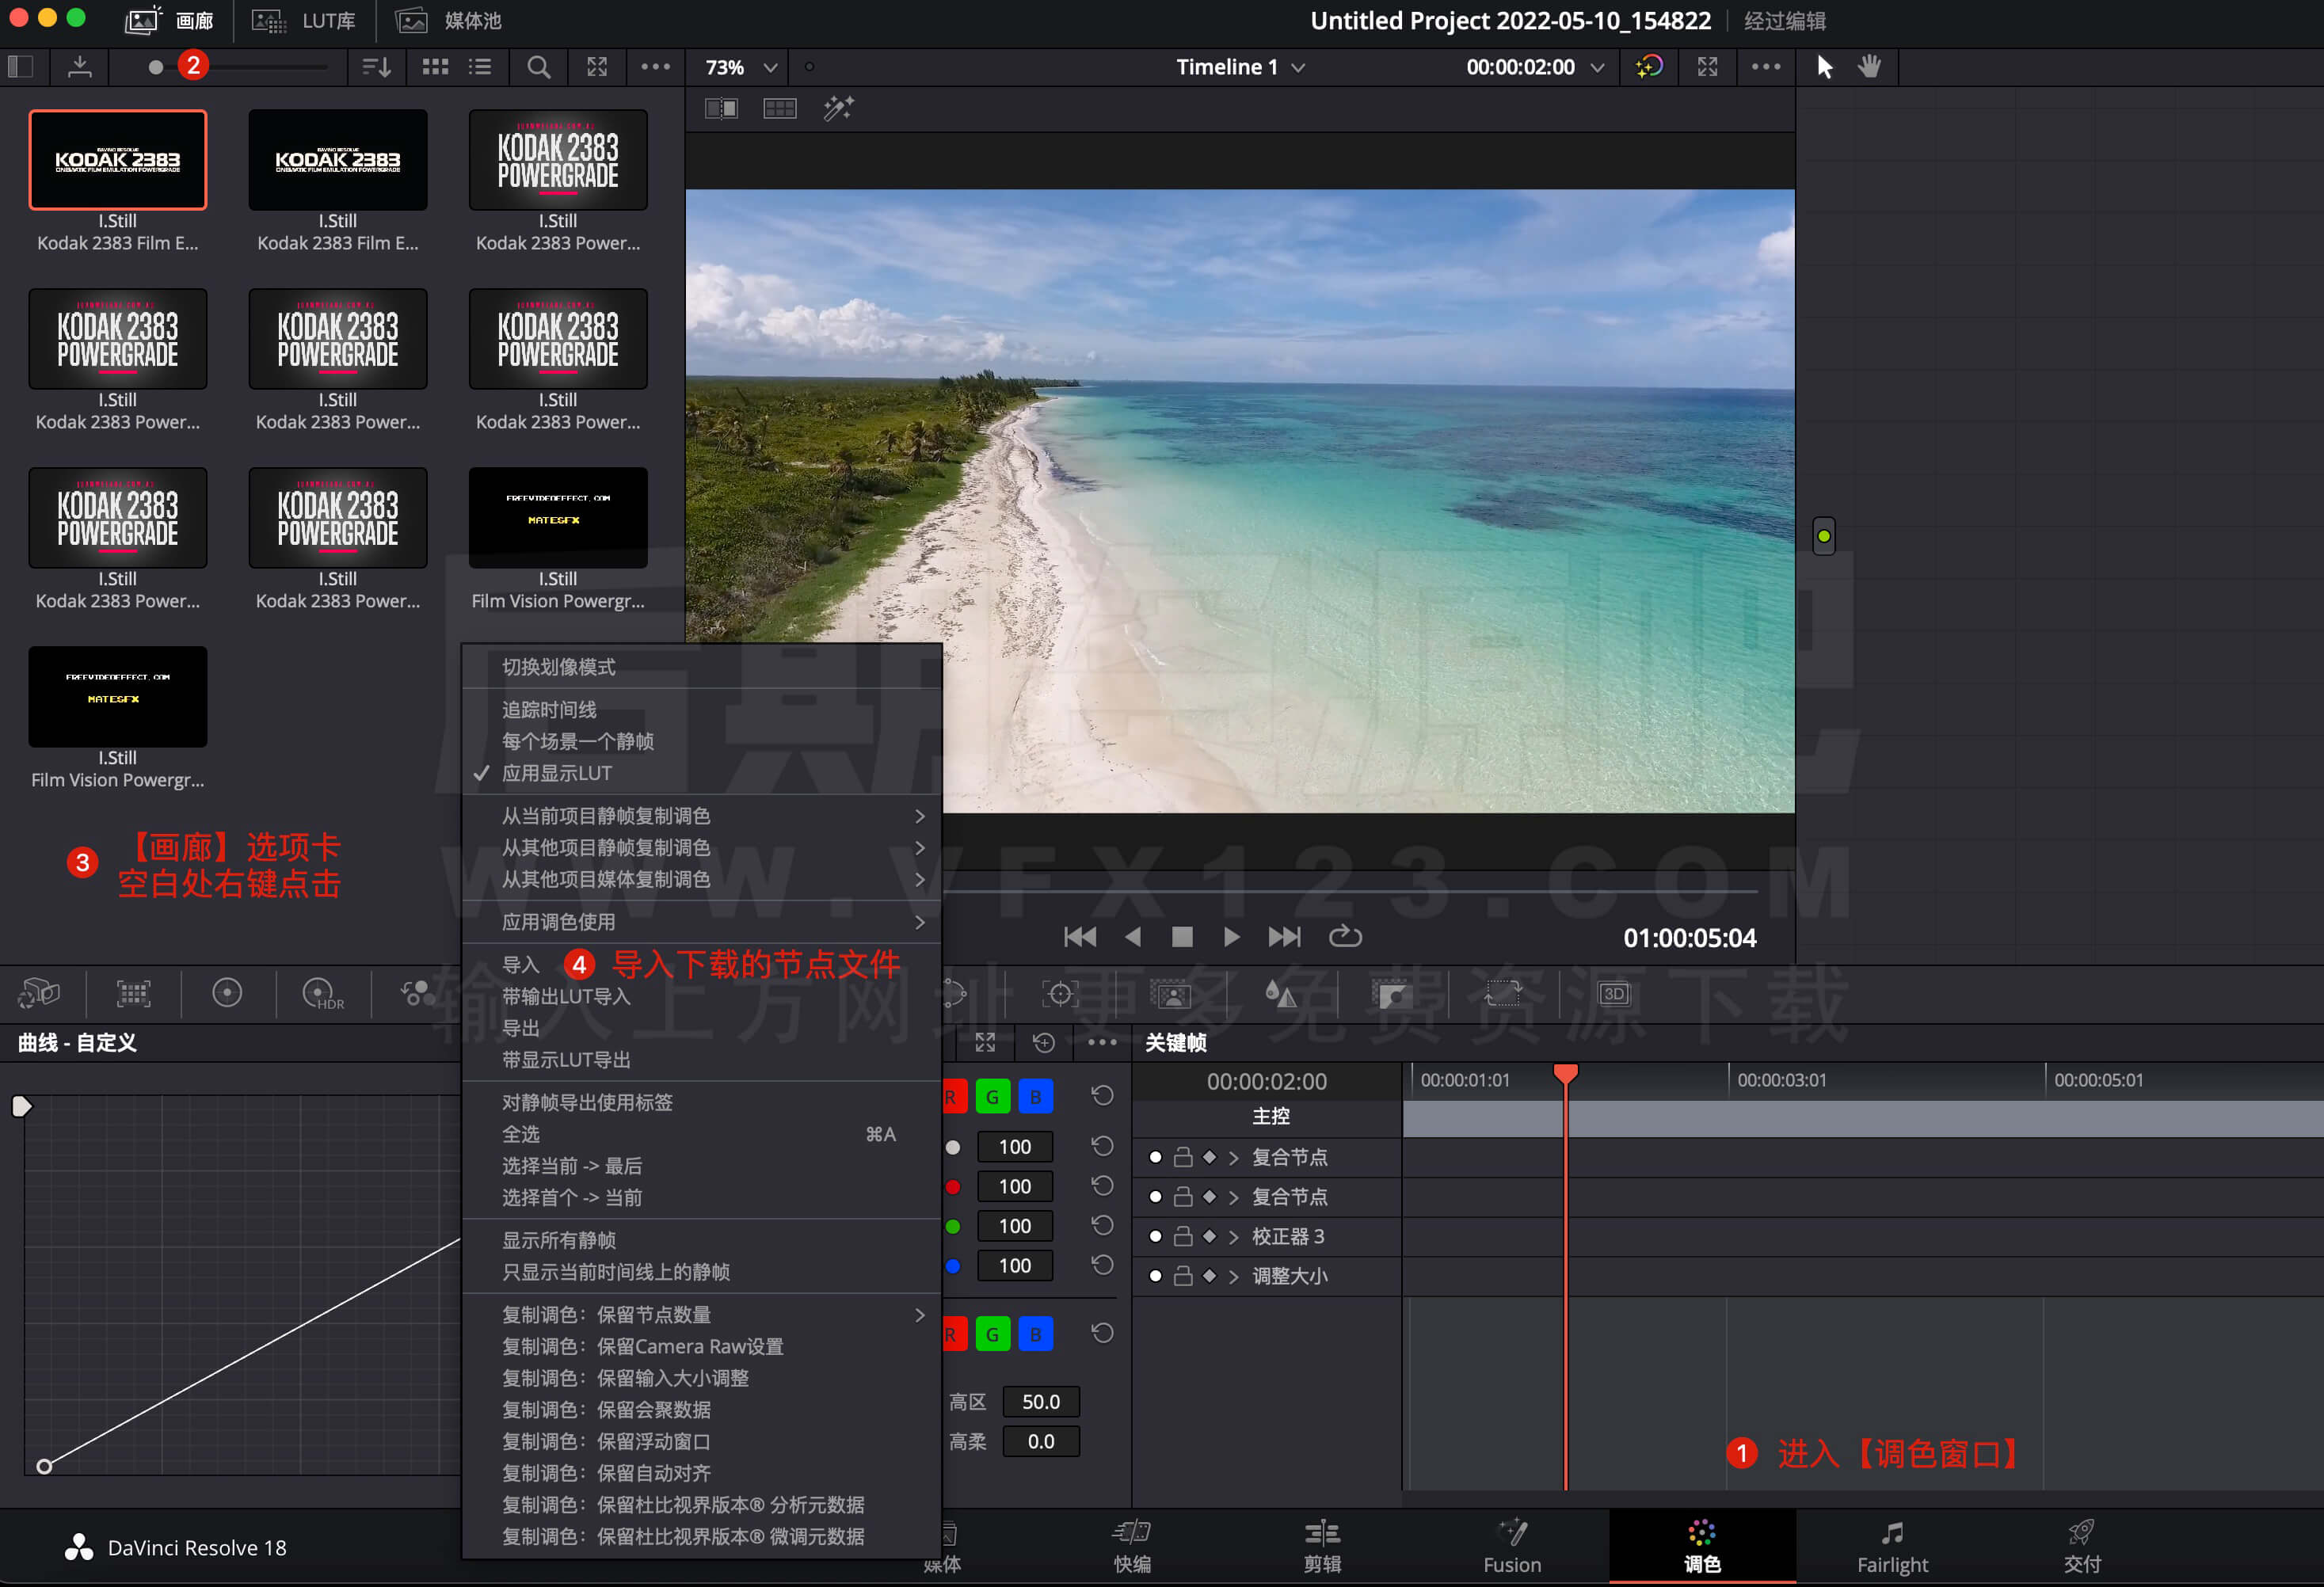
如何在达芬奇中安装DCTL插件?


如何在达芬奇中安装POWERGRADE调色节点?